[DesignPattern] 프로토타입 (Prototype)
09 Sep 2023프로토타입 (Prototype)
원영이 되는(prototypical) 인스턴스를 사용하여 생성할 객체의 종류를 명시하고, 이렇게 만든 견본을 복사해서 새로운 객체를 생성합니다.
활용 방안
프로토타입 패턴은 생성, 복합, 표현 방법에 독립적인 제품을 만들고자 할 때 쓴다.
- 인스턴스화할 클래스를 런타임에 지정할 때
- 제품 클래스 계통과 병렬적으로 만드는 팩토리 클래스를 피하고 싶을때
- 클래스의 인스턴스들이 서로 다른 상태 조합 중에 어느 하나일 때
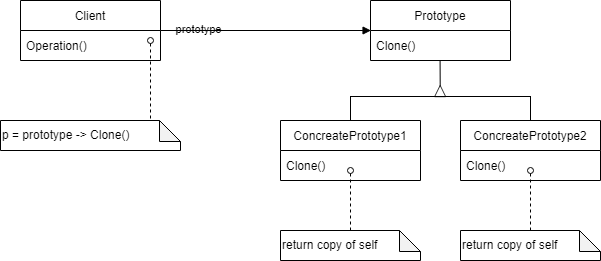
구조

Prototype: 자신을 복제하는 데 필요한 인터페이스를 정의합니다. ConcretePrototype: 자신을 복제하는 연산을 구현합니다. Client: 원형에 자기 자신의 복제를 요청하여 새로운 객체를 생성합니다.
결과
- 런타임에 새로운 제품을 추가하고 삭제할 수 있습니다.
- 값들을 다양화함으로써 새로운 객체를 명세합니다.
- 구조를 다양화함으로써 새로운 객체를 명세할 수 있습니다.
- 서브클래스의 수를 줄입니다.
- 동적으로 클래스에 따라 응용프로그램을 설정할 수 있습니다.
장점과 단점
장점
- 복잡한 객체를 만드는 과정을 숨길 수 있다.
- 기존 객체를 복제하는 과정이 새 인스턴스를 만드는 것보다 비용 적인 면에서 효울적일 수도 있다.
- 추상적인 타입을 리턴할 수 있다.
단점
- 복제한 객체를 만드는 과정이 복잡할 수 있다.
구현
아래의 코드는 Github의 Ropository와 Issue 정보를 넣어 API를 통해 이슈를 작성하는 프로그램이다.
적용전
GithubIssue
public class GithubIssue {
    private int id;
    private String title;
    private GithubRepository repository;
    public GithubIssue(GithubRepository repository) {
        this.repository = repository;
    }
    public int getId() {
        return id;
    }
    public void setId(int id) {
        this.id = id;
    }
    public String getTitle() {
        return title;
    }
    public void setTitle(String title) {
        this.title = title;
    }
    public GithubRepository getRepository() {
        return repository;
    }
    public String getUrl() {
        return String.format("https://github.com/%s/%s/issues/%d",
                repository.getUser(),
                repository.getName(),
                this.getId());
    }
}
GithubRepository
public class GithubRepository {
    private String user;
    private String name;
    public String getUser() {
        return user;
    }
    public void setUser(String user) {
        this.user = user;
    }
    public String getName() {
        return name;
    }
    public void setName(String name) {
        this.name = name;
    }
}
App
public class App {

    public static void main(String[] args) {
        GithubRepository repository = new GithubRepository();
        repository.setUser("dh37789");
        repository.setName("design-pattern-study");

        GithubIssue githubIssue = new GithubIssue(repository);
        githubIssue.setId(1);
        githubIssue.setTitle("1주차 과제: 프로토 타입 패턴에 대해 알아보자");

        String url = githubIssue.getUrl();
        System.out.println(url);
    }
}
만약 동일한 설정을 가지고 두번째 이슈를 발행한다면 아래와 같은 코드가 될 것이다.
public class App {

    public static void main(String[] args) {
        GithubRepository repository = new GithubRepository();
        repository.setUser("dh37789");
        repository.setName("design-pattern-study");

        GithubIssue githubIssue = new GithubIssue(repository);
        githubIssue.setId(1);
        githubIssue.setTitle("1주차 과제: 프로토 타입 패턴에 대해 알아보자");

        String url = githubIssue.getUrl();
        System.out.println(url);

        GithubIssue githubIssue2 = new GithubIssue(repository);
        githubIssue.setId(2);
        githubIssue.setTitle("2주차 과제: 프로토 타입 패턴을 구현해보자.");

        url = githubIssue.getUrl();
        System.out.println(url);
    }
}
두번째 이슈를 발행하기 위해 GithubIssue 클래스의 인스턴스 githubIssue2를 하나더 생성하여 이슈를 발행해야 한다.
Prototype 패턴을 이용하면 기존에 만든 githubIssue 인스턴스를 clone() 메서드를 이용해 복제하여 이슈를 발행할 수 있다.
적용후
clone() 메서드는 Object의 clone메서드를 재정의해서 사용할 예정이다. 하지만 Object 클래스에서 clone은 protect로 지정되어 재정의가 불가능하다.
public class Object {
    ...
    @IntrinsicCandidate
    protected native Object clone() throws CloneNotSupportedException;
}
그러므로 Prototype 패턴을 적용해 복제하고자 하는 클래스에 Cloneable 인터페이스를 구현하겠다고 명시한다.
예시에서는 GithubIssue 클래스를 복제하여 재사용 할 것이므로, 해당 클래스에 인터페이스를 명시하고 clone 메서드를 재정의한다.
그리고 Object의 equals와 hashCode를 같이 재정의하여 둘이 같은 객체임을 비교할 수 있도록 하자.
기본 기능을 사용할 것 이라면 super.clone()을 통해 Object의 clone 메서드를 그대로 사용할 수 있다.
public class GithubIssue implements Cloneable {
    ...
    @Override
    protected Object clone() throws CloneNotSupportedException {
        return super.clone();
    }

    @Override
    public boolean equals(Object o) {
        if (this == o) return true;
        if (o == null || getClass() != o.getClass()) return false;
        GithubIssue that = (GithubIssue) o;
        return getId() == that.getId() && Objects.equals(getTitle(), that.getTitle()) && Objects.equals(getRepository(), that.getRepository());
    }

    @Override
    public int hashCode() {
        return Objects.hash(getId(), getTitle(), getRepository());
    }
}
이후 GithubIssue를 호출해서 사용할 경우 아래와 같이 사용이 가능하다.
public class App {

    public static void main(String[] args) throws CloneNotSupportedException {
        GithubRepository repository = new GithubRepository();
        repository.setUser("dh37789");
        repository.setName("design-pattern-study");

        GithubIssue githubIssue = new GithubIssue(repository);
        githubIssue.setId(1);
        githubIssue.setTitle("1주차 과제: 프로토 타입 패턴에 대해 알아보자");

        String url = githubIssue.getUrl();
        System.out.println(url);

        GithubIssue clone = (GithubIssue) githubIssue.clone();
        System.out.println(clone.getUrl());

      System.out.println("clone != githubIssue: " + (clone != githubIssue));
      System.out.println("clone.equals(githubIssue): " + clone.equals(githubIssue));
      System.out.println("clone.getClass() == githubIssue.getClass(): " + (clone.getClass() == githubIssue.getClass()));
    }
}
위의 코드를 실행하면 아래와 같은 결과가 나타난다. clone()을 통해 인스턴스가 복제된걸 확인할 수 있다.
https://github.com/dh37789/design-pattern-study/issues/1
https://github.com/dh37789/design-pattern-study/issues/1
clone != githubIssue: true
clone.equals(githubIssue): true
clone.getClass() == githubIssue.getClass(): true
clone()
여기서 clone() 메서드의 특징에 대해 알아가야 할 점이 있다. Object 클래스의 clone() Docs를 살펴보도록 하자.
this method performs a “shallow copy” of this object, not a “deep copy” operation.
직역하자면 ‘해당 메서드는 객체를 얕은 복사(shallow copy) 하지만 깊은 복사(deep copy)는 하지 않는다.’ 라는 뜻이다.
얕은 복사와 깊은 복사
얕은 복사와 깊은 복사의 개념은 객체를 복사할 때 참조(Reference)와 데이터(Data) 사이의 관계를 어떻게 다루는지에 대한 것이다.
얕은 복사 (shallow copy)
얕은 복사는 기존 객체의 주소 값을 복사하기 때문에, 복사한 객체는 기존의 원본 객체와 같은 객체의 주소 값을 바라보게 된다.
객체 안에 객체가 있을 경우 원본과 복사한 객체는 동일한 주소 값을 가진다. 그래서 값이 변경될 경우 원본의 값도 변경이 된다..
깊은 복사 (deep copy)
깊은 복사는 원본 객체의 내용을 복사하여 새로운 객체를 생성한다. 이때 복사된 객체는 원본 객체와 완전히 독립적인 객체가 된다. 객체 안에 객체가 있을 경우 별도의 객체가 생성되므로 원본 객체에 영향을 가지지 않는다.
기존 super.clone()을 사용한 코드는 얕은 복사를 사용하므로 복제한 클래스와 원본 GithubRepository 객체 주소는 동일하다.
System.out.println("clone.getRepository() == githubIssue.getRepository(): " + (clone.getRepository() == githubIssue.getRepository()));
clone.getRepository().getClass() == repository.getClass(): true
만약 repository의 URL 값을 변경한다면 기존 repository의 값도 같이 변경이 된다.
GithubIssue clone = (GithubIssue) githubIssue.clone();
repository.setName("new-design-pattern");
System.out.println(clone.getUrl());
https://github.com/dh37789/new-design-pattern/issues/1
깊은 복사를 구현하기 위해서는 기존 재정의한 clone 메서드의 내용을 수정해주어야 한다.
public class GithubIssue implements Cloneable {
    ...
    @Override
    protected Object clone() {
        GithubRepository repository = new GithubRepository();
        repository.setUser(this.repository.getUser());
        repository.setName(this.repository.getName());

        GithubIssue githubIssue = new GithubIssue(repository);
        githubIssue.setId(this.id);
        githubIssue.setTitle(this.title);

        return githubIssue;
    }
}
super.clone()을 통해 얕은 복사를 하는 것이 아니라 새로운 객체를 생성한뒤 반환하는 식의 복제를 진행해야 한다.
이제 다시 결과를 실행해보자.
https://github.com/dh37789/design-pattern-study/issues/1
https://github.com/dh37789/design-pattern-study/issues/1
clone != githubIssue: true
clone.equals(githubIssue): false
clone.getClass() == githubIssue.getClass(): true
clone.getRepository() == githubIssue.getRepository(): false
기존의 객체의 주소값이 달라진걸 볼 수 있다.