[DesignPattern] 데코레이터 (Decorator)
29 Sep 2023데코레이터 (Decorator)
객체에 동적으로 새로운 책임을 추가할 수 있게 합니다. 기능을 추가하려면, 서브클래스를 생성하는 것보다 융통성 있는 방법을 제공합니다.
다른 이름
랩퍼(Wrapper)
동기
가끔 전체 클래스에 새로운 기능을 추가할 필요는 없지만, 개별적인 객체에 새로운 책임을 추가할 필요가 있다. 새로운 서비스의 추가가 필요할 때 이를 해결하는 일반적인 방법은 상속을 이용하는 것이다.
즉, 이미 존재하는 클래스를 상속받고, 또 다른 클래스에서 테두리 속성을 상속받아 이 서브클래스의 인스턴스에 테두리가 있도록 하는 방법이지만 별로 유용하지 않다.
더 나은 방법은 지금 필요한 테두리를 추가하는 다른 객체에다가 해당 구성요소를 둘러싸는 것이다. 이렇게 무엇인가를 감싸는 객체를 데코레이터(decorator)라고 한다.
데코레이터는 자신이 둘러싼 요소, 구성요소가 갖는 인터페이스를 자신도 동일하게 제공하므로, 데코레이터 객체의 존재는 이를 사용하는 사용자에게 감춰진다.
활용성
장식자 패턴은 다음의 경우에 사용한다.
- 동적으로 또한 투명하게(transparent), 다시 말해 다른 객체에 영향을 주지 않고 개개의 객체에 새로운 책임을 추가하기 위해 사용한다.
- 제거될 수 있는 책임에 대해 사용한다.
- 실제 상속으로 서브클래스를 계속 만드는 방법이 실질적이지 못할 때 사용한다.
구조

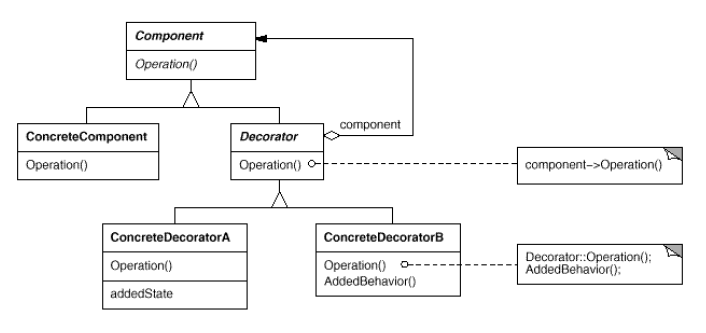
- Component: 동적으로 추가할 서비스를 가질 가능성이 있는 객체들에 대한 인터페이스
- ConcreteComponent: 추가적인 서비스가 실제로 정의되어야 할 필요가 있는 객체
- Decorator: Component 객체에 대한 참조자를 관리하면서 Cmoponent에 정의된 인터페이스를 만족하도록 인터페이스를 정의
- ConcreteDecorator: Component에 새롭게 추가할 서비스를 실제로 구현하는 클래스
결과
데코레이터 패턴을 쓰면서 얻는 이익과 부담은 각각 두가지 이다.
- 단순한 상속보다 설계의 융통성을 더 많이 증대시킬 수 있다.
- 클래스 계통의 상부측 클래스에 많은 기능이 누적되는 상황을 피할 수 있다.
- 데코레이터와 해당 그 데코레이터의 구성요소가 동일한 것은 아니다.
- 데코레이터를 사용함으로써 작은 규모의 객체들이 많이 생긴다.
장점과 단점
장점
- 새로운 클래스르 만들지 않고 기존 기능을 조합할 수 있다.
- 컴파일 타임이 아닌 런타임에 동적으로 기능을 변경할 수 있다.
단점
- 데코레이터를 조합하는 코드가 복잡할 수 있다.
구현
댓글 서비스를 예시들 들어 데코레이터 패턴을 적용해보려 한다. 만약 댓글을 저장하고자 할때, 저장단계에서 스팸 단어를 필터링하거나, 몇몇 특수문자를 공백으로 변환해주는 필터를 적용해보도록 하자.
기존의 상속을 사용한다면 자바에서는 클래스에 다중상속을 지원하지 않으므로 필터를 하나밖에 적용하지 못한다. 이에 대한 방안으로 데코레이터 패턴을 적용하여 여러필터를 적용해 볼 수 있다.
적용전
CommentService
public class CommentService {
    public void addComment(String comment) {
        System.out.println(comment);
    }
}
CommentService는 코멘트를 저장하는 서비스 클래스이다.
Client에서는 위의 서비스 로직을 호출하여 Comment를 저장하는 로직을 실행한다.
Comment를 저장하기에 앞서 적용할 필터는 아래의 두가지이다.
SpamFilteringCommentService
public class SpamFilteringCommentService extends CommentService {

    @Override
    public void addComment(String comment) {
        boolean isSpam = isSpam(comment);
        if (!isSpam) {
            super.addComment(comment);
        }
    }

    private boolean isSpam(String comment) {
        return comment.contains("바보") || comment.contains("멍청이");
    }
}
TrimmingCommentService
public class TrimmingCommentService extends CommentService {

    @Override
    public void addComment(String comment) {
        super.addComment(trim(comment));
    }

    private String trim(String comment) {
        return comment.replace("@", "");
    }

}
SpamFilteringCommentService는 ‘바보’나 ‘멍청이’와 같은 심한말을 댓글로 저장할 수 없도록 spam 설정을 하여 필터링을 하는 역할이다.
TrimmingCommentService는 Comment 를 저장할 때 ‘@’의 문자를 공백으로 치환해주는 역할을 하는 필터이다.
CommentService와 위 필터 두개를 적용한 Client 코드는 아래와 같다.
Client
public class Client {
    private CommentService commentService;

    public Client(CommentService commentService) {
        this.commentService = commentService;
    }

    private void writeComment(String comment) {
        commentService.addComment(comment);
    }

    public static void main(String[] args) {
        Client client = new Client(new SpamFilteringCommentService());
        client.writeComment("오징어게임");
        client.writeComment("보는게 하는거 보다 재밌을 수가 없지...");
        client.writeComment("http://whiteship.me");
    }
}
Client에서는 다중상속이 되지 않기 때문에 CommentService를 상속받은 필터 두가지중 하나만 적용이 가능하다.
한번 데코레이터 패턴을 적용하여, 두가지의 필터를 모두 적용해보록 하자.
적용후
데코레이터 패턴을 적용하기 위해서는 전의 컴포짓 패턴과 동일하게 상위의 인터페이스가 필요하다.
기존의 CommentService(Component)를 인터페이스로 만들어 주고 기존에 Comment의 저장하는 일을 DefaultCommentService(ConcreteComponent)라는 클래스로 만들어 구현을 해주도록 한다.
CommentService
public interface CommentService {
    void addComment(String comment);
}
DefaultCommentService
public class DefaultCommentService implements CommentService {
    @Override
    public void addComment(String comment) {
        System.out.println(comment);
    }
}
이제 데코레이터 패턴에서 필요한 데코레이터 객체가이필요하다.
컴포넌트를 감싼뒤 그대로 감싼 컴포넌트를 호출해주는 역할을 하면 된다. CommentDecorator 는 Decorator의 역할을 한다.
CommentDecorator
public class CommentDecorator implements CommentService {
    private CommentService commentService;

    public CommentDecorator(CommentService commentService) {
        this.commentService = commentService;
    }

    @Override
    public void addComment(String comment) {
        commentService.addComment(comment);
    }
}
CommentService commentService 필드는 생성자로 주입을 받아. CommentService 컴포넌트를 호출해주는 역할을 한다.
이제 CommentDecorator(Decorator)를 상속받는 데코레이터 옵션들을 구현해 주면 된다.
SpamFilteringDecorator
public class SpamFilteringDecorator extends CommentDecorator {
    public SpamFilteringDecorator(CommentService commentService) {
        super(commentService);
    }

    @Override
    public void addComment(String comment) {
        boolean isSpam = isSpam(comment);
        if (!isSpam) {
            super.addComment(comment);
        }
    }

    private boolean isSpam(String comment) {
        return comment.contains("바보") || comment.contains("멍청이");
    }
}
TrimmingCommentDecorator
public class TrimmingCommentDecorator extends CommentDecorator {
    public TrimmingCommentDecorator(CommentService commentService) {
        super(commentService);
    }

    @Override
    public void addComment(String comment) {
        super.addComment(trim(comment));
    }

    private String trim(String comment) {
        return comment.replace("@", "");
    }
}
각각 ‘@’문자를 치환하고 ‘바보’, ‘멍청이’와 같은 단어를 필터링 하는 필터 옵션(ConcreteDecorator)을 CommentDecorator 클래스를 상속받아 만들어 주었다.
이제 만들어준 데코레이터 패턴을 Client에 적용해보도록 하자.
Client
public class Client {

    private CommentService commentService;

    public Client(CommentService commentService) {
        this.commentService = commentService;
    }

    public void writeComment(String comment) {
        commentService.addComment(comment);
    }
}
Client에서는 Componet인 CommentService를 생성자로 받아 댓글을 작성하는 로직을 호출한다.
이제 데코레이터 패턴이 적용된 예시를 Application에서 사용한다면 어떻게 사용될까?
App
public class App {

    private static boolean enabledSpamFilter = true;
    private static boolean enabledTrimming = true;

    public static void main(String[] args) {
        CommentService commentService = new DefaultCommentService();

        /* true 일경우 데코레이터를 적용해서 스팸필터링 데코레이터에 타깃을 넘겨준다. */
        if (enabledSpamFilter)
            commentService = new SpamFilteringDecorator(commentService);

        if (enabledTrimming)
            commentService = new TrimmingCommentDecorator(commentService);

        Client client = new Client(commentService);
        client.writeComment("댓글 1등 입니다.");
        client.writeComment("바보 멍충이");
        client.writeComment("example@naver.com");
    }
}
App에서는 enabledSpamFilter, enabledTrimming의 구분에 따라 스팸필터링이나, 특수문자 치환 같은 ConcreteDecorator로 CommentService 구현체인 DefaultCommentService를 감싸서 데코레이터를 적용해준다.
결과 출력 값은 다음과 같다.
댓글 1등 입니다.
examplenaver.com